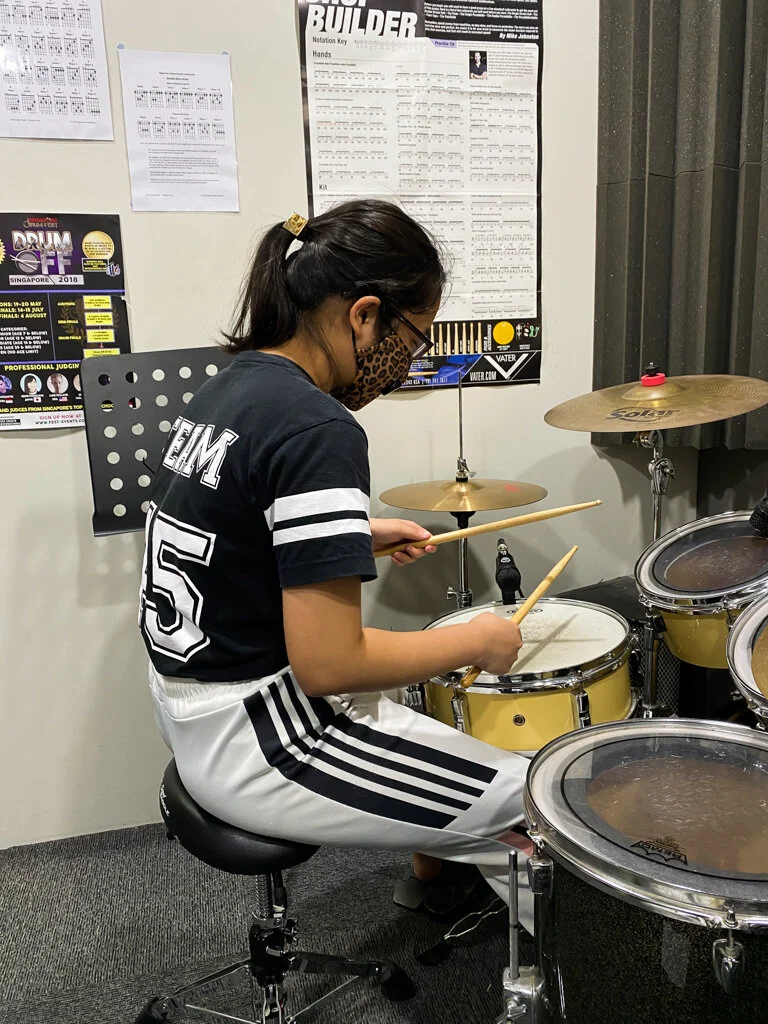
Lesson 1: Drumming Postures

KGMA’S PRACTICAL DRUMMING GUIDE

Lesson 1: Drumming Postures

Welcome to KGMA’s Practical Drumming Guide! We have made this series so that you can get to learn useful drumming tips and techniques that every drummer needs to know!

In this lesson we will cover the basic necessities that you will need to know when you take your first step towards becoming a drummer. Let us guide you through your journey of drumming!

There are three basic things a drummer needs to know: Sitting upright, setting the right height of your drum stool and relaxing your arms.

PROPER POSTURE

It's important to have the right posture and it is the most fundamental basis of being a drummer. Having a good posture reflects our mood and confidence level. It may seem like a basic thing to do, but trust me it matters.

SIT UPRIGHT

Sitting with a slouch while drumming for extended periods of time may inflict extra wear and tear on joints and ligaments. This will cause extreme damage to your back in the long run. You will also notice that professional drummers all sit up straight when they are drumming, so stop for a second and observe the way you are sitting! 


If you notice that you are slouching, try your hardest to sit up straight on the drum stool. Resist the temptations to slouch, it'll improve your drumming dramatically and it will be more comfortable too! It might take a while to get used to, but it will be worth it in the long run. 

slouching - bad posture when drumming

slouching - bad posture when drumming

sitting upright - good posture when drumming

sitting upright - good posture when drumming

SETTING THE RIGHT HEIGHT FOR YOUR STOOL

It is not only important to keep your back straight, but setting the right height for your drum stool is equally as important as well. Setting the height of the stool too high might not let you reach the foot pedal, and setting it too low might not let you step onto the pedal properly. Your feet should reach the pedals and be placed comfortably on it.

Make sure your knees are at the right angle of 90 to 110 degrees.

 
Appropriate drum stool height and knee angle for better drumming

Appropriate drum stool height and knee angle for better drumming


RELAXING YOUR ARMS 

Once you have set your upper and lower body posture correctly, concentrate on your arms. If you find yourself having sore arms after hitting the drums, it is probably because you were feeling tense or gripping the sticks too tightly.

Now, the key to hitting the drums properly is by relaxing your arms, loosening your arm muscles and keeping your arms low as you hit the drums, letting the drum sticks bounce freely.

If you are too tense, you might hurt your arm muscles and will not have energy to carry on drumming.

A tense grip on the drumstick

A tense grip on the drumstick

A more natural and relaxed grip on the drumstick for greater flexibility.

A more natural and relaxed grip on the drumstick for greater flexibility.

After reading all of this, hopefully you will be able to apply them to your daily drumming. A good posture is the start to good drumming. Carry on and keep practicing!

Lesson 2: Drum Kit Set-up

KGMA’S PRACTICAL DRUMMING GUIDE


Lesson 2:  Drum Kit Set-up


In this lesson we will cover the necessities that you need to know when you take your second step towards becoming a drummer! Watch the video below for a more detailed guide on how to set up your drums by our drum teacher Darrill Chan!


There are two basic things a drummer needs to know: Proper Drum Kit Set-Up, Assembling & Arrangements of the Drums and Cymbals.


Proper Drum Kit Set-Up


How you set up your drums plays a very important part in how well you actually play the drums. It could help you to play easier, naturally, more efficiently and without injuring yourself.

Oftentimes, drummers set their drum kit up according to how it looks rather than how it feels. This aesthetic way of setting up might be great for showmanship but could cause you discomfort or injury.

Therefore, it is important to know these information and steps to properly set up your drum kit.


Knowing Your Drum Parts

Firstly, it is important to know and gather the necessary parts for your drum kit such as:


Drums:

      • Bass Drum

      • Bass Drum Pedal

      • Snare Drum Stand

      • Snare Drum 

      • Tom 1

      • Tom 2

      • Floor Tom

      • Drum Stool


Cymbals:

      • Cymbal Stands

      • Hi-hat Cymbals

      • Crash Cymbal

      • Ride Cymbal


After you have gathered all the necessary parts, you will want to find a comfortable spot to place your drum kit. Then, take a look at the position of your drum stool. It is essential to have your drum kit placed in a wide and open space so that there is sufficient space for you to hit your drums.


Assembling and Arrangements of the Drums and Cymbals


Assembling the Drums

  1. Install the bass drum's legs and the bass drum pedal, then place your throne behind the bass drum and adjust it to the proper height. 

  2. Assemble the snare drum in its stand and adjust the snare to a comfortable height. 

  3. Then mount the toms on the bass drum and attach the floor tom's legs and position it in a suitable spot. 

  4. Lastly, check that the height of the Floor Tom is close to the snare. 


Assembling the cymbals

  1. Unfold the hi-hat stand and add the bottom cymbal. 

  2. Install the top hi-hat cymbal.

  3. Install the crash cymbal on its stand. 

  4. Install the ride and any other cymbals (if any). 


Double Check


Get yourself behind the kit, put your right foot on the bass drum pedal and have your legs be at a comfortable distance apart. Hi-hats should be at a comfortable height relative to the snare drums. 


Snare drums should be also placed at a comfortable position aligned to your waist. 


Make sure no part of your kit is in contact with any other parts of your kit. 


Next, make sure your crash and ride cymbals are not touching any metal parts. your cymbals should always have a plastic or rubber felt between them and the screw thread.


Last but not least, make sure that your hi-hats have rubber on both sides of your top cymbal, and your bottom cymbal is not touching any metal.


Now, you are good to go! Happy Drumming!


Lesson 3 (Part 1 of 2): Drum Kit Maintainence

KGMA’s PRACTICAL DRUMMING GUIDE


Lesson 3 (Part 1): Drum Kit Maintenance


In this lesson we will cover another essential part of drumming that every drummer needs to know, cleaning and tuning your own drum set.

Today you will be guided on how to change your drum heads and how to maintain your drum. Watch the video below for a more thorough guide by our drum teacher Darrill. Let's get started!


Changing the Drum Head


Drum heads can get worn out after time, or broken. Hence as a drummer, knowing how to change a drum head is a useful skill to have. 

Here are the following steps you will need to take to change your drum head:

  1. Start by loosening the tension rods evenly, remove the old drum head from the drums. 

  2. With a dry cloth, clean any dust or debris from the rims and wipe the insides of the drum.

  3. Then place the new drum head on the drum, making sure that the new head is centered.

  4. Next, apply pressure in the center of your drums with your palm and push down. 

  5. Then start to tighten the tension rods evenly using your fingers, not using the drum key yet. 

  6. If you find difficulty tightening the tensions rods, try lubricating the rods with vaseline or a paraffin wax.

  7. Last but not least, use a drum key and start to tighten the tension rods for tuning. 


Maintenance Of Your Drums


It is important to keep your drums and equipment clean at all times, to ensure that your instruments have a longer lifespan and that they maintain their proper sound.

You should clean your drums every few months at least, or when dirt and dust starts to accumulate. Simply use a clean cloth to wipe the dust and dirt off the outside of the drum. 

If possible, try to opt for a deep cleaning of drums at least once a year.

...and that’s it for this week! Stayed tuned for part 2 next week where we will teach you how to tune your drums! 😉


Lesson 3 (Part 2 of 2): Drum Kit Maintainence

How do we Tune a Drumset?

Welcome back to part 2 of our drum kit maintenance lesson! We will be covering the tuning of your own drum set.

If you remember, last week we taught you on the changing of the drum head as well as the overall maintenance of your drums. Watch the video below for a more thorough guide on tuning by our drum teacher Darrill. Let's get started!


Drum Tuning

Tuning your drums is crucial to getting the maximum tone, endurance and resonance of your drum head. Even the greatest drummer in the world with the greatest drum kit would sound lousy if they fail to tune their drums. Thus, it is important to learn and keep your drums in tune.

  1. First thing first, you will need a drum key. A drum key is used for tuning drums and it can be obtained at most musical stores. 

  2. Start by using the drum key on a tension rod, any one will do. Tighten it by turning about one and a half times. 

  3. On completion of tuning the first rod, you might want to locate the rod directly opposite of it and tighten it. Keep going back and forth rather than going in a circle so as not to create any unbalance. 

  4. Next, to obtain your ideal tuning, use a drumstick and start banging on the body of the drum a few times. 

  5. Try to be patient at this point of time as patience is the key to success, and it'll reward you in the end! 

  6. If it is not the tuning you were looking for, keep tuning until you reach your desired pitch.


Now that you’ve properly tuned your drums, go ahead and practice. Hope that our lessons have been useful to you so far. Remember, practice makes perfect so happy practicing! :)


Lesson 4: How to hold drum sticks?

Drumstick grip - How do I hold my drumsticks?

In this lesson, we will guide you through the proper method as well as other different ways to hold the sticks. 

Today we will show you two different ways a drummer can grip the sticks: Traditional Grip and Matched Grip, as well as the right and proper way to grip the sticks, finding the fulcrum point.

Let us get started!

Correct Stick Grip

One of the key points a drummer must note is the right way to grip their drum sticks. Oftentimes, many drummers neglect the important foundations of drumming which results in them getting injured. The incorrect grip could lead you to expend a lot of excess energy, causing painful muscle tension and could probably damage your hand and wrist too. 

Fulcrum Point

Fulcrum point can be known as the balancing point or pivot point of the stick. The fulcrum point is located at the point where you pinch your sticks.

To create the fulcrum, grip a drumstick between your thumb and index fingers, (insert picture of fulcrum point) you should be able to tilt back and forth like a seesaw and create a bounce like an elaborated lever.

Make sure you grip your stick tightly, but not too tight. Now try to give it a go and hit the drums.

Once you have found the fulcrum point, you may refer to the different ways to hold a drumstick below.

Ways to hold a drumstick

Matched Grip

Matched grip is the most commonly used grip today, with both hands holding the stick the same way or a mirrored image of each other. With the matched grip, you are mainly holding the stick between the index finger and the thumb, finding the balance point. Over time, you will find this point easily. 

Matched Grip has three variations and the three are:

German Grip:

Hold your sticks 90 degrees to each other, making sure that your palms are facing the ground. It provides more power as the movements are done with your wrist.

French Grip

Face your palms parallel to one another as you hold the drumsticks. This method relies mainly on your fingers so you get to have more finesse over your drumming.

American Grip:

The American grip is a combination of both the French and German grip together. Both the sticks are 45 to 60 degrees apart from each other. With this drum grip, your fingers, wrists and arms will be used. This grip is a general go-to grip by many people as it combines the power and larger wrist motion of the German grip with the quick finger strokes of the French grip.


Traditional Grip

Historically, drummers held the sticks with the traditional grip because they held the drum sideways with a strap on their shoulders. This was before the drum set was created. With the angle of the drums held sideways, they could not grip the sticks using the matched grip on the left hand. As time passes by, the traditional grip technique was passed on to generations and therefore, this is how the traditional grip was formed. (Insert top view video of someone explaining the history)

To this day, you'll find that the traditional grip method is popular among jazz drummers.

With traditional grip, your right-hand grips the stick in a matched grip manner while your left-hand uses a different grip (holding the stick this way). (insert top view picture of both hands in a traditional grip manner.) 

With the stick in your hand, turn your left hand with your palms facing up and slip the stick between your second and third fingers. Then closed the rest of your fingers around the stick with your thumb atop your index finger at the first knuckle. (insert close up picture of left hand)

When you start playing, your sticks should form a 90-degree angle on your drum head, with your left palm facing down and your right palm facing up.(insert top view photo of both hands)

Note to drummers:

It is important to hold the grip correctly to avoid getting injured, and even though they say that practice makes perfect- proper practice will help you to make perfect!

Happy practicing!

Lesson 5: How to play Single Stroke?

How to play Single Stroke?

Single stroke is essential in drumming, there is no running away from it! The Single Stroke is the most common drum rudiment there is. Find out how to play and practice varying types of Single Strokes in the video above!

Single Stroke on Drums

Sticking for the Single Stroke roll

The notations above shows which hand Is playing which note. To play the Single Stroke, you use alternating hands, hitting your drum in the order of Right hand, Left hand, Right hand, etc.

3 forms of Single Stroke that you can vary your Single Strokes with:

  1. Full Stroke
    Played with a wrist angle of 90 degrees or more. The Full Stroke produces the loudest sound.

  2. Half Stroke
    Played with a wrist angle of 45 degrees or more. The Half Stroke is softer than Full Stroke.

  3. Ghost notes
    Played with a wrist angle of below 45 degrees. Playing Ghost Notes produces the softest sound.

2 ways to practice your single stroke

  1. By going from slow to fast and fast to slow when playing any form of Single Stroke

  2. By alternating between the different forms of Single Stroke
    e.g. Full Stroke > Half Stroke > Ghost Notes > Half Stroke > Full Stroke

Stay tuned for our next Drum Lesson which will be on Double Stroke!

Lesson 6: How to play Double Stroke?

How to play Double Stroke?

Double Strokes is built upon Single Strokes. You have to master your Single Strokes to be able to play your Double Strokes well! Do check out Lesson 5 Part 1 on Single Strokes if you haven’t!

notation (2).png

Sticking for the Double Stroke roll

The notations above shows which hand Is playing which note. To play the Double Stroke, you hit your Drum with each hand twice. The first hit should be a Full Stroke, the second hit being a Half Stroke.

A quick recap on what is Full Stroke and Half Stroke:

Full Stroke
Played with a wrist angle of 90 degrees or more. The Full Stroke produces the loudest sound.

Half Stroke
Played with a wrist angle of 45 degrees or more. The Half Stroke is softer than Full Stroke.

How to practice your Double Stroke

By going from Slow to slow and going from Fast to Slow!
Gradually Increase or Decrease the speed at which you are playing.

Grab apair of Drum Sticks and your Practice Pad, Snare Drum or hit any hard surface to practice your Double Stroke now!

Lesson 7: How to read Sheet Music and Play Drum Scores?

Why do I need to learn to read Sheet Music?

It is true, that you do not need to learn to read (and understand) a certain language before attempting to speak it; the same thing applies for music! You do not need to learn to read sheet music to play music.

BUT!

By learning how to read sheet music is just like learning a new language, and in doing so, it helps to deepen and improve your understanding on it. This definitely helps in your development as a musician to be much more independent in your learning and self teaching!


Real Life Applications: Reading of sheet music

For musicians that plays in gigs, it is sometimes impossible to commit many new songs to heart almost immediately and sometimes unexpected changing of songs might happen at the very last minute.
Being able to read sheet music is definitely an asset to your skill list as a musician.


Independnece & co-dependence learning.JPG

How to read (and play) Drum Scores?

We have two ways we would like to recommend on how to read sheet music.

Co-dependence and Independence

Co-dependence Style

The Co-dependence style is a style where you would read the sheet music left to right and play it:

  • without the use of a metronome

  • without a tempo

By doing this, it helps you to better grasp an understanding of what

Independence Style

The Independence style is a style where you break down the sheet music into parts to play, using the top-down approach!

By seeing the sheet music this way, you would break down the sheet music into the different parts of the drum kit, and slowly adding the other parts of the drum kit into the groove you are playing as you get more comfortable.

Metronome Practice

Whether you use the Independence or Co-dependence style of practice, you definitely need to practice with the metronome to get better!

with the help of a metronome, you can be much more accurate and get better at playing!

Tip by Teacher Jolin: Start slow on the metronome, perhaps 40 BPM. You can eventually go faster and faster, and try to go for however fast you can manage!

See You next week for the next Lesson!


Lesson 7b: Playing Drum Groove 2 at different BPM

Do check out Lesson 7 on How to read Sheet music? if you haven’t!

Now that you are able to read Sheet music, have a look at the drum score below:

Groove 2.png

This groove is a little different from Groove 1, Have a go at it!

Were you able to play the Groove? Now use a metronome or a metronome app to play this groove at 60BPM, 80 BPM and 100BPM. Watch the video below to see how it is done!

Lesson 7C: Playing Drum Groove 3 at different BPM

Do check out Lesson 7 on “How to read Sheet music?” if you haven’t!

Now that you are able to read Sheet music, have a look at the drum score below:

Groove 03 - Drum Groove Series.JPG

This groove is a little different from Groove 2, so have a go and tell us how did you fare in the comments section down below!

Do use a metronome or a metronome app to play this groove at 60BPM, 80 BPM and 100BPM to practice for precision!

Watch the video below to see how it is done~


Lesson 7D: Playing Drum Groove 4 at different BPM

Do check out Lesson 7 on “How to read Sheet music?” if you haven’t!

Now that you are able to read Sheet music, have a look at the drum score below:

Groove 04 - Drum Groove Series.JPG

This groove is a little different from Groove 3, so have a go and tell us how did you fare in the comments section down below!

Do use a metronome or a metronome app to play this groove at 60BPM, 80 BPM and 100BPM to practice for precision!

Watch the video below to see how it is done~

Lesson 7E: Playing Drum Groove 5 at different BPM

Do check out Lesson 7 on “How to read Sheet music?” if you haven’t, it is essential to helping you with lessons 7 A-E!

Now that you are able to read Sheet music, have a look at the drum score below:

Groove 05 - Drum Groove Series.JPG

This groove is a little different from Groove 4, so have a go and tell us how did you fare in the comments section down below!

Do use a metronome or a metronome app to play this groove at 60BPM, 80 BPM and 100BPM to practice for precision!

Watch the video below to see how it is done~

Lesson 7F: Playing Drum Groove 6 at different BPM

Do check out Lesson 7 on “How to read Sheet music?” if you haven’t, it is essential to help you with lessons 7 A-F!

Now that you are able to read Sheet music, have a look at the drum score below:

Groove 06 - Drum Groove Series.JPG

This groove is a little different from Groove 5, so have a go and tell us how did you fare in the comments section down below!

Do use a metronome or a metronome app to play this groove at 60BPM, 80 BPM and 100BPM to practice for precision!

Watch the video below to see how it is done!


Lesson 7G: Playing Drum Groove 7 at different BPM

Do check out Lesson 7 on “How to read Sheet music?” if you haven’t, it is essential to help you with lessons 7 A-G!

Now that you are able to read Sheet music, have a look at the drum score below:

Groove 07 - Drum Groove Series.JPG

This groove is a little different from Groove 6, so have a go and tell us how did you fare in the comments section down below!

Do use a metronome or a metronome app to play this groove at 60BPM, 80 BPM and 100BPM to practice for precision!

Watch the video below to see how it is done!

Lesson 7H: Playing Drum Groove 8 at different BPM

Do check out Lesson 7 on “How to read Sheet music?” if you haven’t, it is essential to help you with lessons 7 A-H!

Now that you are able to read Sheet music, have a look at the drum score below:

Groove 08 - Drum Groove Series.JPG

This groove is a little different from Groove 7, so have a go and tell us how did you fare in the comments section down below!

Do use a metronome or a metronome app to play this groove at 60BPM, 80 BPM and 100BPM to practice for precision!

Watch the video below to see how it is done!

Lesson 7I: Playing Drum Groove 9 at different BPM

Do check out Lesson 7 on “How to read Sheet music?” if you haven’t, it is essential to help you with lessons 7 A-I!

Now that you are able to read Sheet music, have a look at the drum score below:

Groove 09 - Drum Groove Series.JPG

This groove is a little different from Groove 8, so have a go and tell us how did you fare in the comments section down below!

Do use a metronome or a metronome app to play this groove at 60BPM, 80 BPM and 100BPM to practice for precision!

Watch the video below to see how it is done!